Sekedar dokumentasi untuk diri sendiri. Kalau berguna bagi yang lain, baguslah.
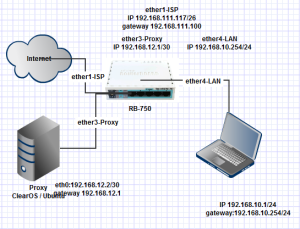
Perangkat yang dipakai RB-750, PC yang sudah diinstall Ubuntu Server 11.10/ClearOS
Untuk setting mikrotik:
[admin@MikroTik] > ip address print
Flags: X – disabled, I – invalid, D – dynamic
# ADDRESS NETWORK INTERFACE
0 192.168.111.117/26 192.168.111.64 ether1-ISP
1 192.168.10.254/24 192.168.10.0 ether4-LAN
2 192.168.12.1/30 192.168.12.0 ether3-Proxy
[admin@MikroTik] > ip route print
Flags: X – disabled, A – active, D – dynamic,
C – connect, S – static, r – rip, b – bgp, o – ospf, m – mme,
B – blackhole, U – unreachable, P – prohibit
# DST-ADDRESS PREF-SRC GATEWAY DISTANCE
0 A S 0.0.0.0/0 192.168.12.2 1
1 A S 0.0.0.0/0 192.168.111.100 1
2 ADC 192.168.10.0/24 192.168.10.254 ether4-LAN 0
3 ADC 192.168.12.0/30 192.168.12.1 ether3-Proxy 0
4 ADC 192.168.111.64/26 192.168.111.117 ether1-ISP 0
[admin@MikroTik] > ip firewall mangle print
Flags: X – disabled, I – invalid, D – dynamic
0 ;;; Proxy
chain=postrouting action=mark-connection new-connection-mark=proxy passthrough=yes dscp=12
1 chain=postrouting action=mark-connection new-connection-mark=proxy passthrough=yes content=X-Cache: HIT
2 chain=postrouting action=mark-packet new-packet-mark=proxy-hit passthrough=no connection-mark=proxy
3 chain=forward action=mark-packet new-packet-mark=ip-2 passthrough=no dst-address=192.168.10.0/24
4 chain=prerouting action=mark-routing new-routing-mark=redirect-to-proxy passthrough=no src-address=192.168.10.0/24
[admin@MikroTik] > ip firewall nat print
Flags: X – disabled, I – invalid, D – dynamic
0 chain=srcnat action=masquerade src-address=192.168.12.0/30
1 chain=dstnat action=dst-nat to-addresses=192.168.12.2 to-ports=53 protocol=udp src-address=192.168.88.0/24 dst-port=53
[admin@MikroTik] > queue tree print
Flags: X – disabled, I – invalid
0 name=”warnet” parent=global-out packet-mark=”” limit-at=0 priority=8 max-limit=0 burst-limit=0 burst-threshold=0 burst-time=0s
1 name=”ip-2″ parent=warnet packet-mark=ip-2 limit-at=0 queue=default priority=8 max-limit=300k burst-limit=0 burst-threshold=0 burst-time=0s
2 name=”proxy-hit” parent=global-out packet-mark=proxy-hit limit-at=0 queue=default priority=8 max-limit=0 burst-limit=0 burst-threshold=0 burst-time=0s
[admin@MikroTik] >
Setting di Ubuntu 11.10.
iwk@ubuntuku:~$ ifconfig
eth0 Link encap:Ethernet HWaddr 00:30:67:e2:7e:7f
inet addr:192.168.12.2 Bcast:192.168.12.3 Mask:255.255.255.252
inet6 addr: fe80::230:67ff:fee2:7e7f/64 Scope:Link
UP BROADCAST RUNNING MULTICAST MTU:1500 Metric:1
RX packets:13550279 errors:0 dropped:0 overruns:0 frame:0
TX packets:14217671 errors:0 dropped:0 overruns:0 carrier:7
collisions:0 txqueuelen:1000
RX bytes:3551171588 (3.5 GB) TX bytes:4025455356 (4.0 GB)
Interrupt:44
lo Link encap:Local Loopback
inet addr:127.0.0.1 Mask:255.0.0.0
inet6 addr: ::1/128 Scope:Host
UP LOOPBACK RUNNING MTU:16436 Metric:1
RX packets:12 errors:0 dropped:0 overruns:0 frame:0
TX packets:12 errors:0 dropped:0 overruns:0 carrier:0
collisions:0 txqueuelen:0
RX bytes:1338 (1.3 KB) TX bytes:1338 (1.3 KB)
iwk@ubuntuku:~$ route -n
Kernel IP routing table
Destination Gateway Genmask Flags Metric Ref Use Iface
0.0.0.0 192.168.12.1 0.0.0.0 UG 100 0 0 eth0
192.168.12.0 0.0.0.0 255.255.255.252 U 0 0 0 eth0
iwk@ubuntuku:~$
Aktifkan Feature Forward:
Edit file /etc/sysctl.conf, lalu hapus tanda pagar di sebelah net.ipv4.ip_forward=1
Edit file /proc/sys/net/ipv4/ip_forward, lalu ganti angkat 0 menjadi 1
Aktifkan Masquerading
Edit file /etc/rc.local, isi perintah di bawah ini sebelum kata-kata “exit 0″
iptables -t nat -A POSTROUTING -s 192.168.10.0/24 -d 0/0 -j MASQUERADE
iptables -t nat -A PREROUTING -p tcp –dport 80 -s 192.168.10.0/24 -d 0/0 -j REDIRECT –to-port 3128
Install lusca.
iwk@ubuntuku:~$ sudo apt-get install lusca
Backup squid.conf
iwk@ubuntuku:~$ cd /etc/lusca
iwk@ubuntuku:~$ sudo mv squid.conf squid.conf.asli
Untuk squid.conf dan storeurl dapat di download di http://speedtest.medan.pesat.net.id/, Untuk download ini, mesti message ke aku lengkap dengan IP Address Publik supaya aku perbolehkan masuk ke serverku.
iwk@ubuntuku:~$ cd /etc/lusca
iwk@ubuntuku:~$ sudo wget http://medan.pesat.net.id/squid.conf.lusca
iwk@ubuntuku:~$ sudo http://medan.pesat.net.id/storeurl
Ganti nama file squid.conf.lusca menjadi squid.conf
iwk@ubuntuku:~$ sudo mv squid.conf.lusca squid.conf
Ganti file storeurl menjadi storeurl.pl
iwk@ubuntuku:~$ sudo mv storeurl storeurl.pl
Matikan service lusca
iwk@ubuntuku:~$ sudo /etc/init.d/lusca stop
Bentuk struktur folder
iwk@ubuntuku:~$ sudo lusca -z
Restart Server
iwk@ubuntuku:~$ sudo reboot
Untuk Clear OS
ClearOS saat diinstalasi cukup dengan paket webconfig dan dan webproxy dan mode standalone-no-firewall.
Seelsaikan pengisian form dari webconfig. (Untuk hal ini gak dibahas, boleh dilihat di forum ClearOS)
Lalu remote ke Proxy dengan IP 192.168.12.2 menggunakan putty, atau langsung di Proxy dengan menekan Ctrl+Alt+F4. Isi username dan password.
Selanjutnya edit di /etc/firewall, perhatian huruf besar dan kecilnya.
edit opsi berikut:
SQUID_TRANSPARENT=”off” menjadi SQUID_TRANSPARENT=”on”
Untuk mengaktifkan Masquerading dan Redirect Proxy ke port 3128, edit /etc/rc.d/rc.firewall.local dan isikan perintah iptables berikut di dalamnya, perhatikan spasi dan besar kecil hurufnya. (Bukan di /etc/rc.local)
iptables -t nat -A POSTROUTING -s 192.168.0.0/16 -d 0/0 -j MASQUERADE
iptables -t nat -A PREROUTING -p tcp –dport 80 -s 192.168.0.0/16 -d 0/0 -j REDIRECT –to-port 3128
Aktifkan fitur Forwarding:
Edit file /etc/sysctl.conf, lalu hapus tanda pagar di sebelah net.ipv4.ip_forward=1
Edit file /proc/sys/net/ipv4/ip_forward, lalu ganti angka 0 menjadi 1
Restart ClearOS.
Mudah-mudahan berhasil 😀

